HealthSync User Guide
"HealthSync will be your patient’s best friend, the frontdesk’s right hand, and time’s biggest foe." - Yi Chee, Developer, HealthSync

HealthSync is a powerful desktop application designed specifically for clinic assistants in small private clinics. It offers a unique combination of a Command Line Interface (CLI) and a Graphical User Interface (GUI) to efficiently manage and organize patient details. If you're a fast typist, HealthSync can streamline your workflow and help you handle patient information more effectively than traditional GUI apps.
Why HealthSync?
Tailored for Front Desk Workers: HealthSync is built with the needs of front desk workers in mind. It provides a user-friendly interface that simplifies patient management tasks, allowing you to focus on providing excellent service to patients.
Fast and Efficient: With HealthSync's CLI, you can quickly navigate through commands and perform actions without the need to rely solely on a mouse. This saves you valuable time and makes patient data management faster and more efficient.
Comprehensive Patient Details: HealthSync enables you to store and access comprehensive patient details, including personal information, medical history, appointments, and more. All the essential information you need is organized in one centralized location.
Intuitive GUI Experience: HealthSync's GUI complements the CLI by providing a visual representation of patient data. The GUI is intuitive and user-friendly, making it easy to view and update patient information with just a few keys.
Using this Guide
This guide encompasses everything you need to know for using HealthSync.
If you're new to HealthSync, start by checking out the Quick Start for a smooth introduction.
If you're already familiar with HealthSync, you can refer to the Features section for a comprehensive list of commands and their usage.
Here are the icons you will see throughout this User Guide and what they mean:
- 💡 Tips and tricks that will help you get the most out of HealthSync
- 🔧 Example usages of the feature that will help you save time
- ❗️ Things to take note of while reading the User Guide
- ⚠️ Things to take caution with, as they may affect your use of HealthSync
Quick start
Ensure you have Java
11or above installed in your Computer.Download the latest
healthsync.jarfrom here.Copy the file to the folder you want to use as the home folder for your HealthSync.
Open a command terminal,
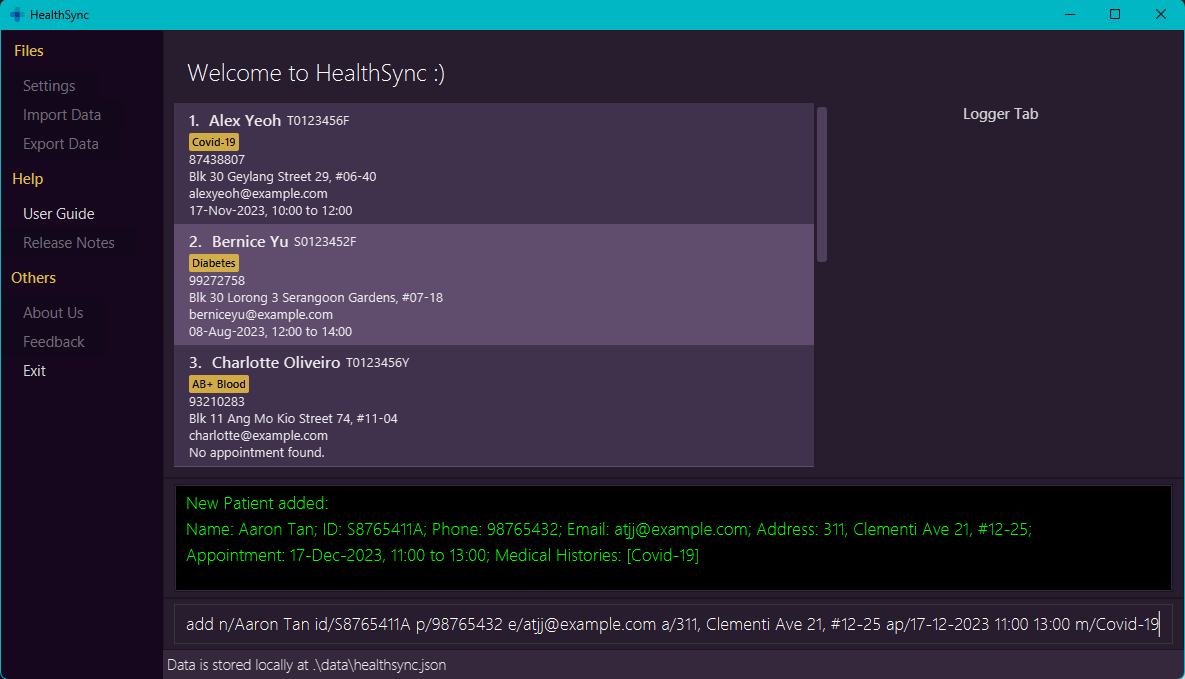
cdinto the folder you put the JAR file in, and use thejava -jar healthsync.jarcommand to run the application.A GUI similar to the below should appear in a few seconds. Note how the app contains some sample data.

The main application consists of the:
💡 Click on the components in the list above to learn more about them.
⚠️*: The buttons that are in grey and not pressable in the Menu Sidebar are currently not functional and will be implemented in a future version of HealthSync
Type the command in the command box and press Enter to execute it. e.g. typing
helpand pressing Enter will open the help window.
Some example commands you can try:list: Lists all patients.add n/John Doe id/S8765432A p/98765432 e/johnd@example.com a/311, Clementi Ave 2, #02-25 ap/17-10-2023 11:00 13:00 m/hypochondriac: Adds a patient namedJohn Doewith the relevant field details to HealthSync.delete n/Alex Yeoh: Deletes Alex Yeoh's details from the current list.clear: Deletes all patients.exit: Exits HealthSync.
Refer to the Features below for details of each command.
Features
We will also be highlighting more technical terms throughout this User Guide, so do check out the Glossary if you are confused.
Check it out here.
❗️ To enhance the User Guide's clarity, command outputs have been simplified and are now presented with added information indicated by an ellipsis (...)
💡 Longer outputs have to scrolled to be viewed
Viewing Help: help
Shows a message explaining how to access the help page. The link will bring the user to the User Guide.
Format: help
💡 Use
has a shortcut to utilise thehelpcommand
💡 Click on
Copy URLafter entering thehelpcommand and paste the link in your preferred browser
Listing All Patients: list
Shows a list of all patients in HealthSync.
Format: list
💡 Use
lsas a shortcut forlist

Adding a Patient: add
Adds a patient into HealthSync, with the given patient information.
- A patient's Name and ID are required when creating a new entry into HealthSync.
- All the compulsory fields must be provided.
- Optional fields like Appointment and Medical History need not be provided.
⚠️ Once a patient is created, their Name and ID cannot be changed later
⚠️ HealthSync currently does not allow patients with identical Names. Similarly, identical IDs are not allowed.
💡 Duplicate Names will be allowed in the future, so stay tuned for updates
Format:
add n/NAME id/ID_NUMBER p/PHONE_NUMBER e/EMAIL_ADDRESS a/ADDRESS [m/MEDICAL_HISTORY]... [ap/APPT]
💡 Use
aas a shortcut foradd
Example commands:
add n/Aaron Tan Jun Jie id/S8943782H p/98114839 e/example@mail.com a/Serangoon HDB 123
Expected outputs when the command succeeds:
New Patient added: ...
Expected outputs when the command fails:
Patient already exists in HealthSync.Invalid command format! ...
Editing a Patient's Details: edit
Edits an existing patient's details in HealthSync.
- Edits the patient with the specified Name and/or ID.
- If an invalid Name and/or ID is passed, an error message will be logged.
- At least one field to edit must be provided.
- Existing fields will be updated to the input values.
- If the particular field does not exist, the corresponding field with details will be added.
⚠️ Name and ID cannot be edited
💡 Update multiple fields in a single
editcommand to save time
edit n/NAME <field> <[field]>...edit id/ID_NUMBER <field> <[field]>...edit n/NAME id/ID_NUMBER <field> <[field]>...
💡 Use
eas a shortcut foredit
Example commands:
edit n/Alex Yeoh p/91234567 e/alexyeoh@example.com

Expected outputs when the command succeeds:
Edited patient: ...
Expected outputs when command fails:
INVALID name and/or ID! ...Invalid command format! ...
Deleting a Patient or Field: delete
Deletes the specified patient or patient's specific details from HealthSync.
- Deletes the patient or an optional field of the patient with the specified Name or ID.
- You can choose to delete using only Name or ID.
- If both Name and ID are used, both must be valid and belong to the same patient.
- You can only delete one patient at a time.
- To delete a specified field only instead of the entire patient, indicate the field in the command.
- You do not have to specify the value of that field to delete it, if HealthSync only stores 1 value for that field.
- If you do not specify which field to delete for fields that can have multiple values, HealthSync will delete everything for that field.
- The fields currently allowed for deletion are Appointment and Medical History.
delete n/NAME [ap/] [m/MEDICAL_HISTORY...]delete id/ID_NUMBER [ap/] [m/MEDICAL_HISTORY...]delete n/NAME id/ID_NUMBER [ap/] [m/MEDICAL_HISTORY...]
💡 Use the shortcut
dfor faster patient-deleting
Example commands:
delete n/Alex Yeohdelete n/John Doe m/
💡 Specify the medical history to be deleted using
m/if it's the only medical history that needs to be deleted e.g.delete n/John Doe m/Diabetes

Expected outputs when the command succeeds:
Deleted Patient: ...Deleted Patient's field: ...
Expected output when the command fails:
The given combination of Name and ID does not match any patient in the Patients list.Invalid command format! ...
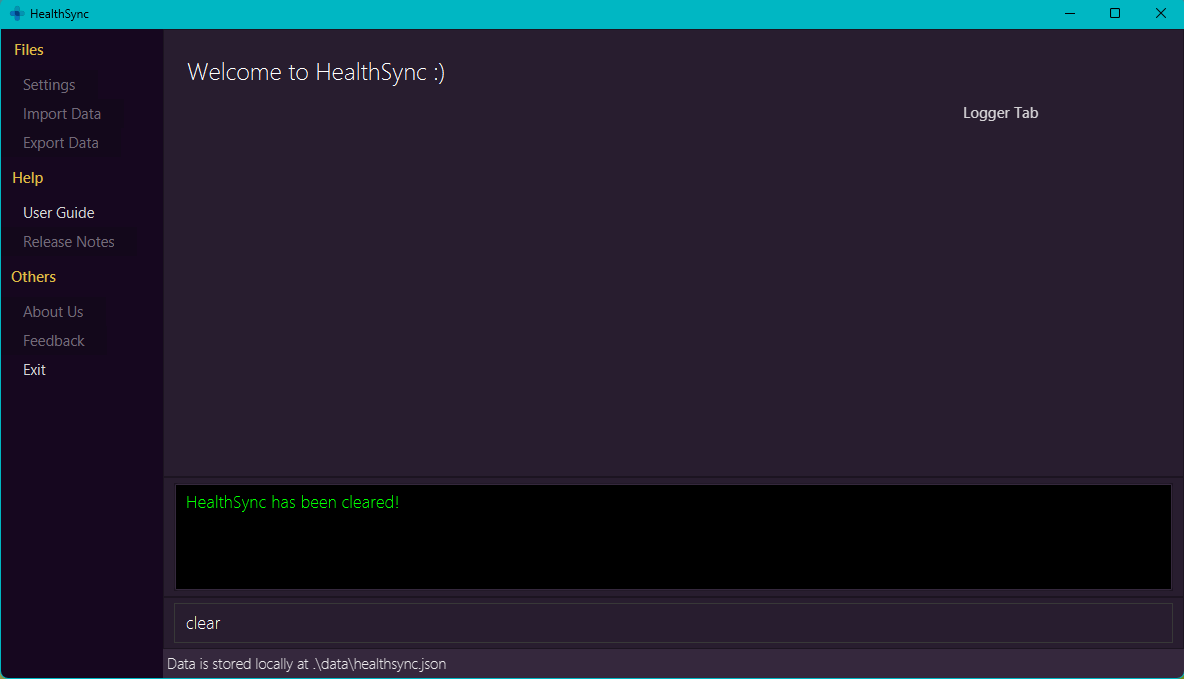
Delete All Patients: clear
Deletes all patients from HealthSync.
Format:
clear
💡 Use the undo command to revert accidentally clearing HealthSync
💡 Use
cas a shortcut forclear
Locating Patients by Name, ID or Appointment: find
Searches the patient list for all patients matching the Name, ID or Appointment and returns their related information.
- The search is case-insensitive.
e.g.
hanswill matchHans,08-Jan-2023 12 13will match08-jan-2023 12 13. - The order of the keywords does not matter. e.g.
Hans Bowill matchBo Hans. - Name, ID Number and Appointment can be searched.
- Only full words will be matched e.g.
Hanwill not matchHans. - For the name and ID, only patients matching at least one keyword will be returned.
e.g.
Hans Bowill returnHans Gruber,Bo Yang. - For Appointment, patients with any overlap in their appointment timings will be returned.
e.g.
10-Aug-2023 0900 0900will return all patients with appointment timings containing that period. - If multiple different fields are specified, they must ALL match the values given.
e.g.
n/Hans Bo ap/10-Aug-2023 0900 0900will return all patients matching BOTH the keywordsHans Boand the appointment timing for 10th August 23, 9 o'clock.
find n/NAMEfind id/ID_NUMBERfind ap/APPT- You may combine the fields. Example:
find n/NAME id/ID_NUMBER
💡 Use the shortcut
ffor faster patient-finding
Example commands:
find n/Alex Yeohfind id/T0123436Ffind ap/12-Dec 0000 2359find n/Alex Yeoh id/T0123436F

💡 This list command can be used to show the original patient list after a find command is executed
Preserving a find Command Result in the Log: log
Logs the result of the find command to the logger tab, which can be viewed at all times.
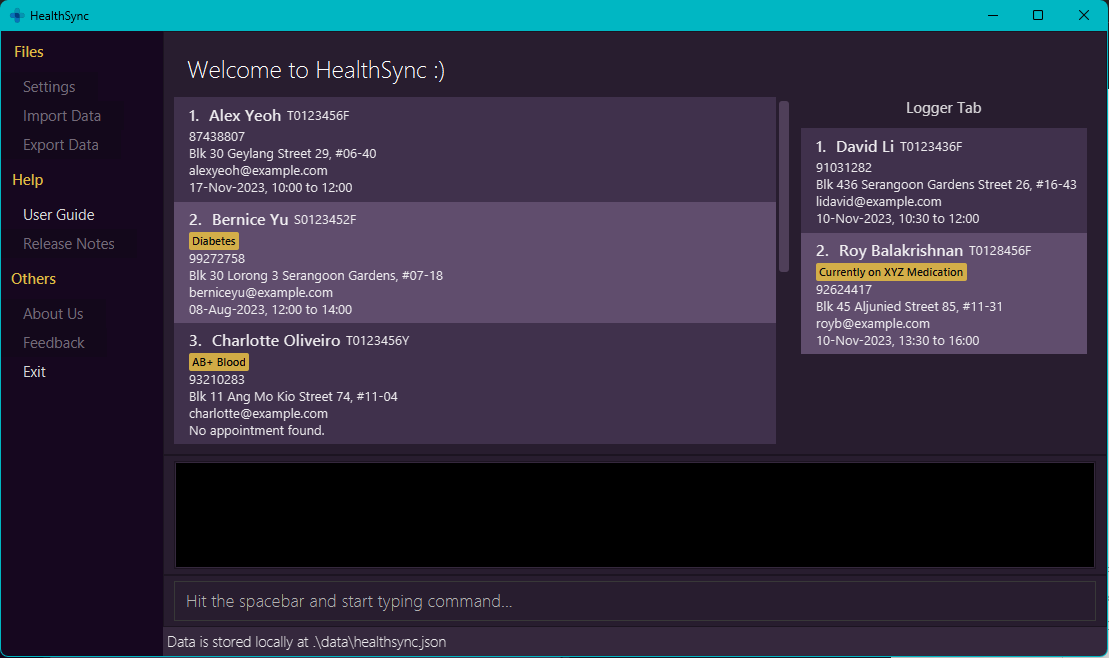
Upon starting HealthSync, the logger tab is pre-populated with profiles of patients who have different appointments.
This is how it looks like:
🔧 If you want to access the patient list or look up a new patient but would still need to refer to the current patient's details, simply
logso the profile stays on your screen while you carry out your other tasks!
- Saving to the logger tab only works for results of the
findcommand. - The entire result will be saved.
- The result will be saved in the same order and format.
- Saving a new result completely clears the current saved result from the logger tab and replaces it.
Format:
log
💡 Use the shortcut
lofor faster patient-logging
Example Command: log (after performing a find on the list)

Expected outputs when the command succeeds:
The last filtered values have overridden the logger tab.
Expected output when the command fails:
Cannot log an empty list.
💡
logoverwrites the data currently in the logger tab, so you do not need to clear the logger tab before using this command
⚠️ The logger tab does not update when logged patients' profiles are edited or deleted. The logger tab is intended to be a snapshot of the patients' details at the time that they were logged. To reflect the edited changes in the logger tab after a change has been made, do
logafter the change.
Adding a New find Command Result to the current Log: alog
Appends the new results of the most recent find command to the current data in the logger tab, which can be viewed at all times.
💡 Use
alogto save patient data you want to continue referring to, on top of the profiles you currently have logged
🔧 If you have multiple patients you need to toggle between, and do not want to keep doing
findto retrieve their data, simplyalogso their profiles stay on your screen for easy access!
- Adding to the logger tab only works for results of the
findcommand. - The previously-saved result will remain the same.
- The entire new result will be saved below the previously-saved result.
- The result will be saved in the same order and format.
- Duplicate patients will not be appended to the log.
Format:
alog
💡 Use the shortcut
alfor faster log-appending
Example Command: alog (after entering a FindCommand)

Expected outputs when the command succeeds:
The last filtered values have been added onto the logger tab.
Expected output when the command fails:
Cannot log an empty list.
💡
alogdoes not overwrite the data and instead adds on to it, so you do not have to keep performinglogto save more data
Clearing Data from the Log: clog
Clears all current data in the logger tab.
💡 Use
clogcommand if you do not need the data in the current logger tab anymore
Format:
clog
💡 Use the shortcut
clfor faster log-clearing
Example Command: clog

Expected output:
Logger tab has been cleared!
Undoing a Command: undo
Undoes the last undo-able action within HealthSync.
- An undo-able action includes the
add,clear,delete,edit,log,alogandclogcommands. undoallows you to undo a specific number of previous commands if you specify a number behind the keyword.undocan only undo the previous commands provided it does not exceed the size of the command history stack.
⚠️ Upon closing HealthSync, the undo history will be erased
undo [number]
💡 Note that this command uses
[number]! This means you can optionally put in the number of actions you wish to undo.
💡 Use
uas a shortcut forundo
💡 Simply entering
undowill undo the last command
Example commands:
undo 2

Expected outputs when the command succeeds:
Undoing 2 command(s): ...
Expected outputs when command fails:
Please proved a valid number of steps to undo, not exceeding the available command history.Undo step count cannot be a negative number or zero.
Exiting HealthSync: exit
Exits HealthSync.
Format:
exit
💡 Use
exas a shortcut forexit
Auto Save
HealthSync data are saved in the hard disk automatically after any command that changes the data is executed. There is no need to save manually.
💡 Only patient details inside patient list view are saved. The logger tab and command history used for
undoare not saved after the application is closed.
Editing the Data File
HealthSync data are saved automatically as a JSON file [JAR file location]/data/healthsync.json.
Advanced users are welcome to update data directly by editing that data file.
⚠️ Caution: If your changes to the data file makes its format invalid, HealthSync will discard all data and start with an empty data file at the next run. Hence, it is recommended to make a backup of the file before editing it.
To make a backup of the file:
- Locate the
healthsync.jsondata file on your computer. This file is located in the same directory ashealthsync.jar. The path is[JAR file location]/data/healthsync.json.- Right-click on the
healthsync.jsonfile, and select 'copy'.- Choose the location where you want to store the backup copy. You can create a separate folder for backups or choose any locations of your choice.
- Right-click in the chosen location and select 'paste'. This creates a copy of the
healthsync.jsondata file in the selected backup location.That's it! You can now safely edit the original
healthsync.jsonfile.If anything goes wrong during the editing process, you can restore your data by copying the backup file back to its original location.
Archiving Data Files [coming in v5.0]
It allows you to efficiently store and organize patient records in HealthSync. With this feature, you can maintain a tidy and easily accessible archive of patient data, ensuring streamlined data management and quick retrieval when needed.
FAQ
Q: What operating systems does HealthSync support?
A: HealthSync is a cross-platform application and supports Windows, macOS, and Linux. Simply follow the
installation guide and download the jar file to use the application.
Q: What are the advantages of using a CLI interface in HealthSync over traditional GUI apps?
A: HealthSync's CLI interface offers faster data entry and navigation for users who are comfortable with typing.
It streamlines tasks and provides a more efficient way to manage patient details.
Q: Can multiple users access HealthSync simultaneously, and how do I set up user accounts?
A: HealthSync is currently an application for a single user. Hence, it cannot be accessed simultaneously
by different users.
Q: How do I import patient data from external sources into HealthSync?
A: The data file that is storing current patient data will be stored in data/healthsync.json by default under the same folder.
You may import patient data and store into that file. However, do adhere to the data format present in the current file.
Q: How do I transfer my data to another Computer?
A: Install the app in the other computer and overwrite the empty data file it creates with the file that contains
the data of your previous HealthSync home folder.
Q: Can I use HealthSync offline, or does it require an internet connection?
A: HealthSync is designed to work offline, ensuring you can access and update patient data even when you don't have
an internet connection.
Q: What happens if there is a system crash or power outage while I'm using HealthSync?
A: HealthSync includes auto-save functionality to minimize data loss in case of unexpected events.
The app will attempt to recover your work upon restart.
Known issues
- When using multiple screens, if you move the application to a secondary screen, and later switch to using only
the primary screen, the GUI will open off-screen. The remedy is to delete the
preferences.jsonfile created by the application before running the application again.
Glossary
Command Format
Refers to the standardized way you have to type in your instructions to HealthSync. Currently, there are 2 main types of Command Formats.
- Fielded commands, which require you to add additional information behind the instruction.
- Field-less commands, which do not need you to specify any more information to function.
Fielded Command Formats will generally look like this:
<KEYWORD> <identity> <field>... <[field]>
<KEYWORD>is the word used to tell HealthSync what to do.- Example: to tell HealthSync to add a patient, you would use
addas the keyword.
- Example: to tell HealthSync to add a patient, you would use
<identity>represents compulsory identifying fields that need to be included with for that instruction type.- See Fields to understand how identifying fields are specified.
<field>refer to the information fields that can be specified in each command.- Unless otherwise specified, the specified field is compulsory.
- Example: for
add, you would specify additional information like phone number and address. - See Fields to understand how each entry is specified.
Square brackets
[<field>]indicate that the field is optional to include for that command.- Example: if the command specifies
[ap/APPT], you can choose if you wish to specify an appointment or not for that particular command.
- Example: if the command specifies
<field>...indicate that multiple information fields can be provided.- If
<field>is specified, multiple values for that particular field type can be provided.- Example: if the command specifies
m/MEDICAL_HISTORY..., you can specifym/First History m/Second History.
- Example: if the command specifies
- If
<field>is directly given in square brackets, then you may optionally add multiple different field types behind that command.- Example: if the command directly specifies
<[field]>..., you can specify any ofp/PHONE_NUMBER,ap/APPT, etc. - The information fields are restricted by how they are specified. See Fields to see the restrictions placed on the fields.
- Example: if the command directly specifies
- If
orcan be specified between 2 identifying fields. This means that you may exclude one of the fields for that instruction type, or you may mix-and-match to include them together.- EXAMPLE: for
edit n/NAMEoredit id/ID_NUMBERcan be given asedit n/John,edit id/001Aoredit n/John id/001A.
- EXAMPLE: for
<identity>,<field>and<[field]>can generally be specified in any order.- Example: if the command specifies
n/NAME p/PHONE_NUMBER,p/PHONE_NUMBER n/NAMEis also acceptable.
- Example: if the command specifies
Field-less Command Formats will generally look like this:
<KEYWORD>
- For field-less commands, only the
<KEYWORD>will be read by HealthSync, and the rest of the data you give it will be ignored.- Example: if
help 123was typed in, HealthSync will interpret it ashelp.
- Example: if
Exceptions to the format exist, but rest assured as you will be told that they do not follow the standard when they are encountered.
Fields
Fields are the entries you have to input the patient's information for. These would include names, phone numbers, appointment times, etc. Fields can be classified into 2 groups:
- Identifying fields, to let you know who the patient is. These are unique to the patient entry.
- Information fields, which gives you other information on the patient.
The 2 identifying fields of a patient are given below:
| Tag | Representative Value | Example Usage | General Form in Commands |
|---|---|---|---|
n/ | Name | n/Alex | n/NAME |
id/ | Identification Number | id/S2345678A | id/ID_NUMBER |
1 or more identifying fields must be specified in each command, unless stated otherwise.
In addition to the identifying fields, information fields can be specified behind commands. The information fields are given below:
| Tag | Representative Value | Example Usage | General Form in Commands | Remarks |
|---|---|---|---|---|
p/ | Phone Number | p/91234567 | p/PHONE_NUMBER | |
e/ | Email Address | e/example@a.com | e/EMAIL | |
a/ | Address | a/Location, Here Rd | a/ADDRESS | |
m/ | Medical History | m/Asthmatic | m/MEDICAL_HISTORY | Can have multiple of this field |
ap/ | Appointment | ap/11-2-2023 11:00 12:00 | ap/APPT |
Name
The standard unique identifier for your patient. Each patient should have a unique alphanumeric name assigned to them.
ID
The ID-based unique identifier for your patient. Each patient should have a unique alphanumeric ID assigned to them.
There is no verification system in place for ID. This allows you to use your custom identifier for your patients, if you wish.
Phone Number
A phone number to contact your patients with. Each patient should be assigned to 1 phone number.
Phone numbers must be numeric, and it must be at least 3 digits long. It does not have to be unique.
Email Address
An email address to contact your patients with. Each patient should be assigned to 1 email address, which doesn't need to be unique.
Emails should be in the format local-part@domainname.
local-partis alphanumeric, and may also contain these symbols:+_.-domainnameshould be the site that the email leads to, such asgmail.com,mail.- These must be separated by an
@symbol.
Address
The address to contact your patients. Each patient should be assigned to 1 address that they live in, and it does not have to be unique.
Addresses do not have a strict format to adhere to.
Medical History
The medical history of your patients. These are optional fields to assign to patients, and every patient can have more than 1 medical history.
Individually, medical histories do not have a strict format to adhere to. However, every medical history a patient has should be unique from one another.
Some examples of valid Medical History formats are listed here:
Hypertension
Covid-19
Pneumonoultramicroscopicsilicovolcanoconiosis
Appointment
The appointment slot assigned to your patients. A patient may have no appointment assigned to them. Currently, only 1 appointment may be assigned to a patient at a time.
Appointments should be given in this sequence: Date, Start Time, End Time. For example,
1-Aug-2023, 11:00 13:00 is a valid appointment denoting an appointment on 1st August 2023, from 11am
to 1pm.
- The month and day of the appointment should always be included.
- Day can be given as a 1 to 2-digit number. It will only be accepted if the day can exist in that month or year.
- Month can be given as a 1 to 2-digit number or a 3-letter word. Example:
Junand6both represent June. - The year is optional. If not included, HealthSync assumes it to be this year.
- The date should be hyphenated.
- The time should be given in 24-hour clock format, with 00:00 as 12am.
- Colons are optional when time is given with hours and minutes. If no colons are given, you need to pad the hour with
a zero when necessary. Example:
1200for 12 noon,0900for 9am. - You may exclude minutes if you wish. Example:
15will be interpreted as 3pm. - Date and the 2 Times needs to be separated by a comma or a space.
- Appointment with the start and end time being the same is valid (ie. 0-minute appointment). HealthSync will register the start time as it is, and register end time as unconfirmed. This is useful for when you are unsure of the end time of an appointment.
Some examples of valid Appointment formats are listed here:
1-Nov 8 10
1-11-2023 10 12
03-03-23 0800 1400
4-Sep, 1800, 2000
CLI
Command Line Interface. Refers to computer programs which require you to type to interact with it.
GUI
Graphical User Interface. Refers to computer programs with a visual window you can interact with directly.
Menu Sidebar
The Menu Sidebar is the area on the left of the Patient List View. It contains buttons that allow you to perform actions on HealthSync. Currently, only the User Guide and Exit buttons are functional. The buttons that are in grey and not pressable in the Menu Sidebar are currently not functional and will be implemented in a future version of HealthSync.
Patient List View
The main part of HealthSync where the list of all your patients are displayed. This is where you can view a list of Patient Card(s), and perform actions on them. When actions are performed, the Patient List View will be updated to reflect the changes/results.
Patient Card
A card that represents a patient in the Patient List View.

Annotation of Person Card (From top-to-bottom):
- Patient's name, ID
- Medical Histories (in the form of bubble tags)
- Phone Number
- Address
- Email Address
- Medical Appointment.
Logger Tab
A 'sticky-note'-like area on the right of the Patient List View. Serves as a snapshot of the patient data at the time they were logged with the log command.
This comes in handy when you want to refer to certain patient profiles at the side, while still being able to carry on with other tasks.
To maximise utility, upon app start, the logger tab displays a list of profiles of patients who have appointments on the day itself. This can be overwritten by the log command for patient profiles thereafter.
Output Box
A small box right below the Patient List View where HealthSync will provide any feedback it has on the instructions it has performed. This includes error messages, success messages, and other information like example commands.
Command Box
The area where you type your instructions for HealthSync to perform.
💡 You can use the
Spacebarto focus on the Command Box. This allows you to type your instructions without using the mouse to click on the Command Box.
Command History Stack
The group of instructions HealthSync remembers performing. This group allows HealthSync to undo the instructions and return your list to an older state. This stack will be cleared when you exit HealthSync.
Java
A piece of software that our program builds on. In order to use HealthSync, your computer must be running at least version 11 of Java. Get it here.
JSON
JavaScript Object Notation. This is the file format used by HealthSync to save and store information.
Command summary
| Action | Shortcut | Format, Examples |
|---|---|---|
| Help | h | help |
| List | ls | list |
| Add | a | add n/NAME id/ID_NUMBER fields ... e.g., add n/James Ho id/SXXXX123D p/91234567 a/A Estate, Clementi Rd, 1234665 e/james@example.com |
| Edit | e | edit n/NAME [field] ... edit id/ID_NUMBER [field] ... e.g., edit n/James Lee e/jameslee@example.com |
| Delete | d | delete n/NAME [field] ...delete id/ID_NUMBER [field] ... e.g., delete n/Alex Yeoh m/Diabetes |
| Clear | c | clear |
| Find | f | find n/NAME find id/ID_NUMBER find ap/APPOINTMENT e.g., find n/James Jake or find id/T0123436F or find ap/08-aug-2023 0000 2359 |
| Log | l | log |
| Append Log | al | alog |
| Clear Log | cl | clog |
| Undo | u | undo |
| Exit | e | exit |